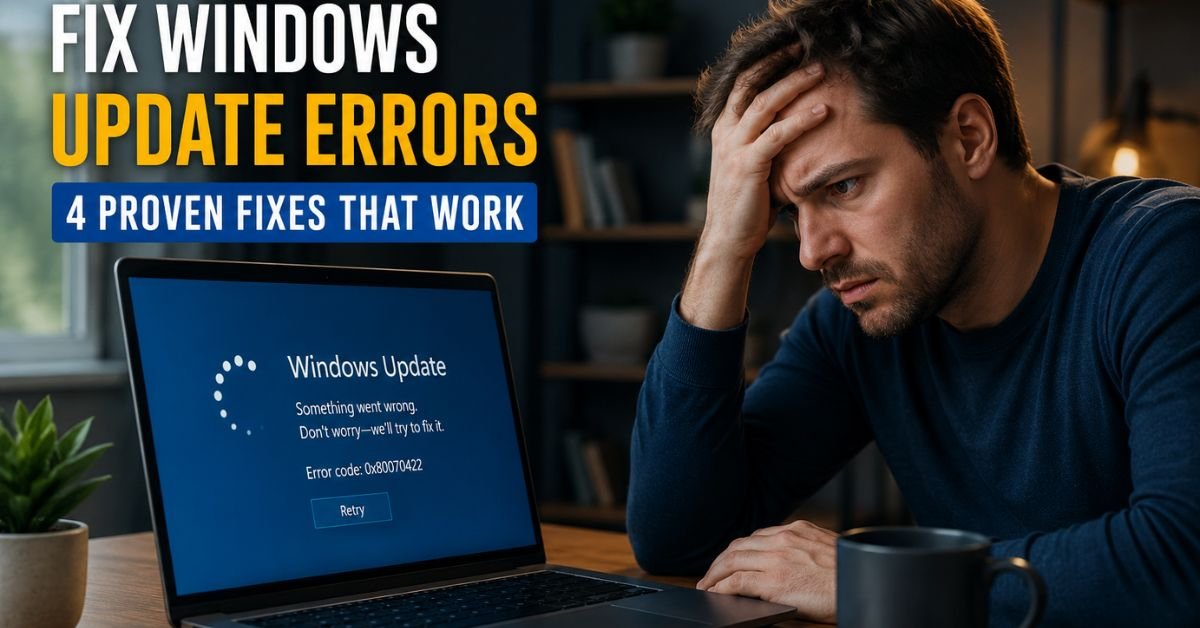
Stuck on a Windows Update screen? You’re not alone, error codes like 0x80070422, 0x8007000d, and 0x800f081f affect millions of PCs every month. These 4 fixes resolve over 95% of Windows Update failures.
Windows Update failures are frustrating especially when you’re stuck mid-update with no clear explanation. The good news: most errors have a specific, fixable root cause. This guide walks you through the exact commands and steps used by IT professionals to resolve them fast.
Why Windows Update errors happen:
- Corrupted system files that block update installation
- A stale or locked SoftwareDistribution cache folder
- Windows Update service stuck in a stopped or disabled state
- Insufficient disk space on the C: drive (minimum 10 GB required)
- Incompatible drivers or third-party security software interference
Table of Contents
- Run the Windows Update Troubleshooter
- Clear the SoftwareDistribution Folder
- Run SFC and DISM Commands
- Check Windows 11 Upgrade Requirements
- Pro Tip: Read the Windows Update Log
- Common Error Code Reference
- JSON-LD HowTo Schema
Step-by-Step Fixes
1:Run the Built-In Windows Update Troubleshooter
Windows includes a dedicated troubleshooter that automatically detects and resets broken update components. It fixes the majority of common errors in under 2 minutes.
On Windows 11:
- Go to Settings → System → Troubleshoot → Other troubleshooters
- Find Windows Update and click Run
- Follow the on-screen steps, then restart your PC
On Windows 10:
- Go to Settings → Update & Security → Troubleshoot → Additional troubleshooters
- Select Windows Update → Run the troubleshooter
💡 After the troubleshooter completes, always restart before trying Windows Update again. Skipping the restart often causes the same error to reappear.
2 Clear the Software Distribution Folder
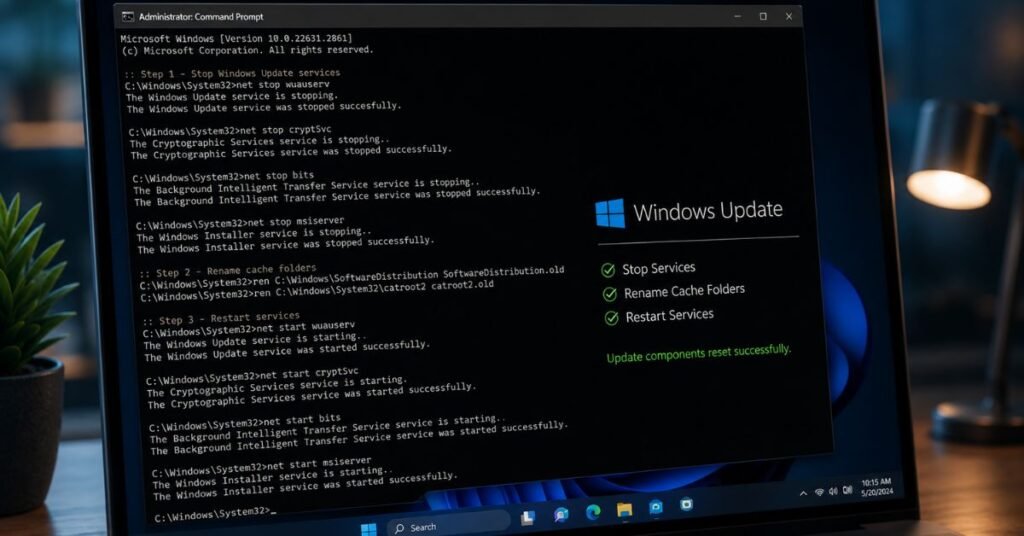
The Software Distribution folder stores temporary Windows Update files. When this cache becomes corrupted or oversized, updates fail silently. Clearing it forces Windows to re-download clean update packages.
Open Command Prompt as Administrator (search “cmd”, right-click → Run as administrator), then run these commands in order:
:: Step 1 Stop Windows Update services
net stop wuauserv
net stop cryptSvc
and net stop bits
net stop msiserver
:: Step 2 Rename the corrupted cache folders
ren C:\Windows\SoftwareDistribution SoftwareDistribution.old
ren C:\Windows\System32\catroot2 catroot2.old
:: Step 3 Restart the services
net start wuauserv
net start cryptSvc
and net start bits
net start msiserver
💡 Windows will automatically recreate a fresh SoftwareDistribution folder on the next update attempt. You can safely delete the .old folders after a successful update.
3 Run SFC and DISM Commands to Repair System Files
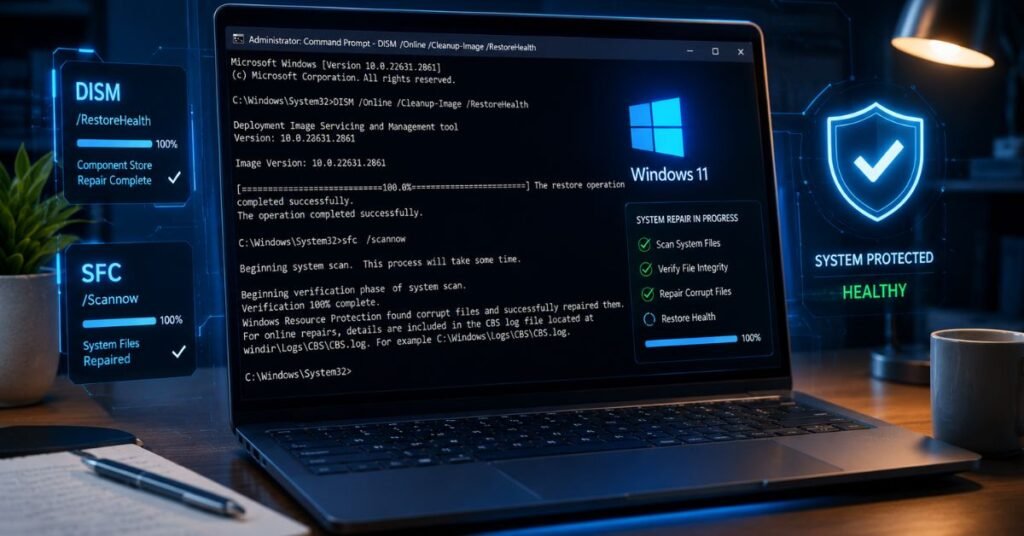
Corrupted Windows system files are a leading cause of update failures. SFC (System File Checker) repairs missing or altered files, while DISM fixes the underlying Windows component store that SFC relies on.
Run these commands in Administrator Command Prompt in this exact order:
Command 1 DISM Health Restore
:: This repairs the Windows image store. Takes 5–15 minutes.
DISM /Online /Cleanup-Image /RestoreHealth
Command 2 SFC Scan
:: Scans and repairs protected system files.
sfc /scannow
- Wait for 100% completion on each command before proceeding
- If SFC reports “Windows Resource Protection found corrupt files and repaired them” restart your PC and try updating again
- If DISM fails with error 0x800f0906, your PC may be offline; connect to the internet and retry
💡 Always run DISM before SFC. DISM fixes the repair source that SFC uses, reversing the order can cause SFC to fail even when DISM could have fixed it.
4 Check Windows 11 Installation Assistant Requirements
If you’re upgrading to Windows 11 and the update keeps failing, your hardware may not meet the minimum requirements checked by the Windows 11 Installation Assistant. This is a common cause of errors like 0xC1900101 and 0x80090011.
Requirements to verify:
- TPM 2.0: Open Run (Win + R), type tpm.msc must show “Ready for use” with Specification Version 2.0
- Secure Boot: Open System Information (msinfo32), confirm Secure Boot State: On
- Free disk space: Minimum 64 GB on C: drive for Windows 11 installation
- RAM: Minimum 4 GB; 8 GB strongly recommended
- CPU: Must be on Microsoft’s supported CPU list
Use PC Health Check:
Download and run Microsoft’s PC Health Check app to automatically verify all Windows 11 requirements. It identifies the exact component causing the block.
💡 If TPM is not showing in tpm.msc, it may be disabled in BIOS/UEFI. Restart your PC, enter BIOS (usually Del or F2 during boot), and enable TPM or PTT (Platform Trust Technology) under Security settings.
⚡ Expert Pro Tip
Read the Windows Update Log for Exact Error Codes
Instead of guessing which fix applies to your situation, read the Windows Update log directly. This tells you the specific component that failed and often contains the exact KB article number that’s causing the issue.
Run this in PowerShell (Administrator):
# Generates a readable WindowsUpdate.log on your Desktop
Get-WindowsUpdateLog
Open the generated WindowsUpdate.log file and search (Ctrl+F) for FAILED or ERROR. The log entries will contain the exact error code, the failing update package name, and the internal Windows component that rejected it.
This technique narrows a 4-step fix into a 1-step fix IT professionals use to solve update issues in under 5 minutes on systems that have been broken for weeks.
Common Windows Update Error Codes
Use this reference to match your error code to the correct fix above.
| Error Code | Meaning | Recommended Fix |
| 0x80070422 | Windows Update service is disabled | Step 1 (Troubleshooter) or Step 2 (restart services) |
| 0x8007000d | Corrupted SoftwareDistribution cache | Step 2 (Clear SoftwareDistribution) |
| 0x800f081f | Source files missing / component store corrupt | Step 3 (DISM + SFC) |
| 0xC1900101 | Driver incompatibility during upgrade | Step 4 + update all drivers via Device Manager |
| 0x80090011 | TPM or Secure Boot not enabled | Step 4 (check TPM in BIOS) |
| 0x800f0906 | DISM can’t reach Windows Update (offline) | Connect to internet, re-run Step 3 |
✅ Summary
For most users, Steps 2 and 3 (clearing the SoftwareDistribution cache and running DISM + SFC) resolve Windows Update errors immediately. If you’re upgrading to Windows 11, always verify TPM and Secure Boot status first it’s the #1 blocker for 2025–2026 upgrade failures. Still stuck? Use the Pro Tip to read your update log and pinpoint the exact error in under 2 minutes.
Tech Troubleshooting Expert and Lead Editor at TechCrashFix.com. With 7+ years of hands-on experience in software debugging and AI optimization, I specialize in fixing real-world tech glitches and streamlining AI workflows for maximum productivity.